
Procedural Map Generation With Noise
Permalink
I wanted to write an article and, even though I have a list of drafts and ideas about things I want to write, I thought: hmm, I would like to do something more fun. That reminded me of the article I wrote about fractal snowflakes and how to generate them, which gave me an idea 💡!
I have been hosting this procedural map generator that I wrote a few years ago, but it’s completely random. What if I reuse it and make it interactive? Well, here we are! Today I present you this exact same procedural map generator, built in JavaScript, but now totally interactive.
We can say I’ve been slightly fascinated by procedural generation before. I have read about it a few times and done a few fun things, but I am by no means an expert. Everything that I bring here is based on information I read somewhere. Anyways, let’s start.
First of all, let’s quickly define procedural generation. Wikipedia has a nice page about it. I would like to focus on the following (my emphasis):
In computing, procedural generation (sometimes shortened as proc-gen) is a method of creating data algorithmically as opposed to manually, typically through a combination of human-generated assets and algorithms coupled with computer-generated randomness and processing power. In computer graphics, it is commonly used to create textures and 3D models. In video games, it is used to automatically create large amounts of content in a game.
So basically using some kind of algorithm and using randomness to generate something. Today we’ll be generating pseudo-random terrain-like maps. For that, we’ll be using Perlin and Simplex noise. Not together, but the library we’ll be using supports both, so why not?
I am not going to go over details about how this noise works, but the gist is that we give the algorithm an x and a y, i.e., the coordinates of the pixel in the map, and it outputs a value between -1 and 1. This value is then used to determine the color of the pixel, together with some other arguments.
The Generator
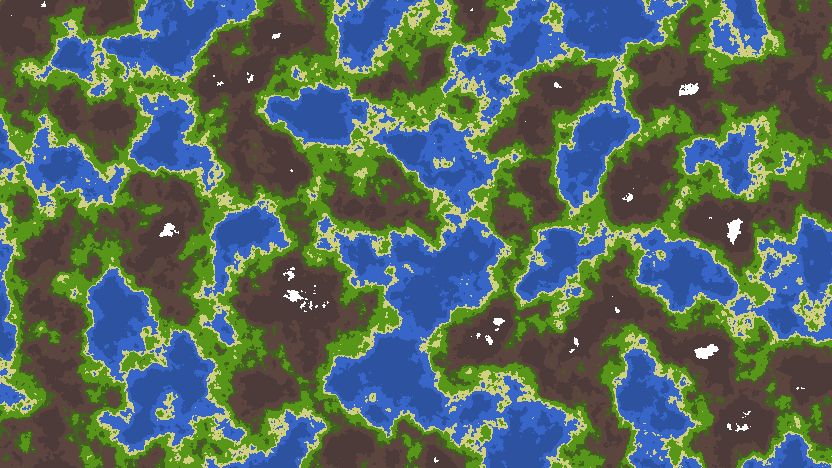
Before continuing, however, let’s see one of the fun parts of this article: the interactive implementation! The image below is being rendered using the seed and noise algorithm. Modify these values and see how it changes! You can also save the image by right clicking.
Some other parameters that you have to take into account can be modified above. These are:
- Scale - the number to scale the map by. Take this as a zooming value: the higher it is, the less you will be able to see, as you are localizing within a certain point. The lower it is, the more of the map you can see. Just like when you zoom in and out a regular map.
- Octaves - the number of gradients being mixed to generate the pixel value. The higher the value, the more detailed the map will be. However, it seems to “flatten” out at a certain point, and increasing the value does not make large changes.
- Persistence - how long the gradients last for. The higher the value, the higher the amount of individual “structures” you will see on the map.
- Lacunarity - adds more randomness into the algorithm. In this case, the higher the value, the more details you’ll see in terms of corners and “gaps”.
I’m not the best at explaining this, so I would recommend you to just try it out! Each of the values affects how the map looks, sometimes in similar ways. Before continuing, I want to say that Red Blob Games has a fantastic article on procedural map generation from noise. I think this article from 2015 was my original inspiration to build this back in 2018. They also have a very nice interactive 3D map generator!
The Code
Now, onto the code! For our noise, we will be using this noise library, which provides functions to generate both Perlin and Simples noise within a 2D environment. Let’s just quickly go over some variable definitions that we will need to use later in the code:
// The noise library. We will use it as 'Noise'.
const Noise = window.noise

// Seed the noise algorithm for randomness. By using a random number, we ensure
// the generated map is always different. Feel free to change for a static number.
Noise.seed(Math.random())

// Define the remaining parameters.
const scale = 150
const octaves = 5
const persistence = 0.5
const lacunarity = 2.5

// Fetch our canvas.
const canvas = document.querySelector('#map canvas')
As you see, we will not be dynamically creating a canvas, but you could do that. Here’s an example of you could build that canvas to ensure it would have a 16 : 9 aspect ratio. This is also similar to the one being used in this page.
<div id="map">
  <canvas />
</div>

<style>
#map {
  aspect-ratio: 16/9;
  position: relative;
}

#map canvas {
  width: 100%;
  height: 100%;
  object-fit: cover;
  display: block;
}
</style>
Now that we have all required parameters defined, our canvas created, we “just” need to generate the elevation map and draw in our canvas. The first step is to generate the elevation map, which we can do as follows (see inline comments):
// Build an elevation map of the size of the canvas.
let elev = [...Array(canvas.height)].map(e => Array(canvas.width))

// Keep the minimum and maximum values so we can do linear interpolation
// to determine the color to assign each pixel.
let min = Number.POSITIVE_INFINITY
let max = Number.NEGATIVE_INFINITY

// Generate the elevation map for every pixel in the canvas.
for (let y = 0; y < (canvas.height; y++) {
  for (let x = 0; x < canvas.width; x++) {
    let amplitude = 1
    let frequency = 1
    let noise = 0

    // Apply each one of the octaves on top of each other.
    for (let i = 0; i < octaves; i++) {
      let sX = x / scale * frequency
      let sY = y / scale * frequency

      // Add the noise. Noise.perlin2 could be used instead.
      noise += Noise.simplex2(sX, sY) * amplitude
      amplitude *= persistence
      frequency *= lacunarity
    }

    // Update maximum and minimum values.
    max = Math.max(noise, max)
    min = Math.min(noise, min)
    elev[y][x] = noise
  }
}
I would highly recommend this tutorial about noise for more background information regarding all the things you see here: amplitude, noise, etc. Now that we have the elevation map, we have to fill the pixels in the canvas with the correct value. For this, we use linear interpolation to interpolate the elevation value to be between 0 and 1. Then, run that value through a biome function that determines the color of the pixel according to the value.
const ctx = canvas.getContext('2d', { alpha: false })

for (let [y] of elev.entries()) {
  for (let [x] of elev[y].entries()) {
    // Use linear interpolation to get the elevation value between 0 a 1.
    let n = (elev[y][x] - min) / (max - min)

    // Fill the rectangle with right color representing this value.
    ctx.fillStyle = biome(n)
    ctx.fillRect(x, y, 1, 1)
  }
}
In this article, I am using the following biome colors and thresholds. The lower the value, the closer to the bottom of the ocean we are. The higher values would be the peak of the mountains, hence closer to white.
function biome (e) {
  if (e < 0.3) {
    return '#2c52a0'
  } else if (e < 0.4) {
    return '#3766c8'
  } else if (e < 0.45) {
    return '#d0d080'
  } else if (e < 0.55) {
    return '#589619'
  } else if (e < 0.60) {
    return '#426220'
  } else if (e < 0.70) {
    return '#5c453e'
  } else if (e < 0.90) {
    return '#4d3b39'
  } else {
    return '#ffffff'
  }
}
You could certainly play with this to make the rendered maps look more or less realistic. For example, you could generate a gradient between two colors that are between two values in order to create a smooth ocean surface.
Well, I do hope you have enjoyed this article as much as I did enjoy revitalizing this hidden piece of code. I’ve also written a similar version of this in Go back in 2018. Also, I am aware this might not be the most performant code! Let me know if it takes too long to render 🗺️ on your machine. For me it’s less than 150ms, which is fine for the article I would say.